

Image grain is essentially the term used to describe noise or the visually warped appearance of digital photographs. It doesn’t have to be a common issue in the field of digital photography. Although using a high ISO setting on your camera usually results in grainy images, many other factors can cause your shots to look less than ideal.
We can’t control everything, but we can also make many adjustments to the phone/camera hardware, lighting, and the quality and settings you select (ISO and shutter speed).
Fortunately, there are several ways to enhance your photos online, such as using Photoshop, Lightroom, iPhone, Android, or the simple, affordable choice Designify. You may quickly upgrade your images and improve by using the advice provided below on how to fix a grainy photo.
How To Fix A Grainy Photo
Discover how to fix a grainy photo into breathtaking pieces of art if you’re sick of grainy, low-quality pictures by reading on!
How To Fix A Grainy Photo In Photoshop
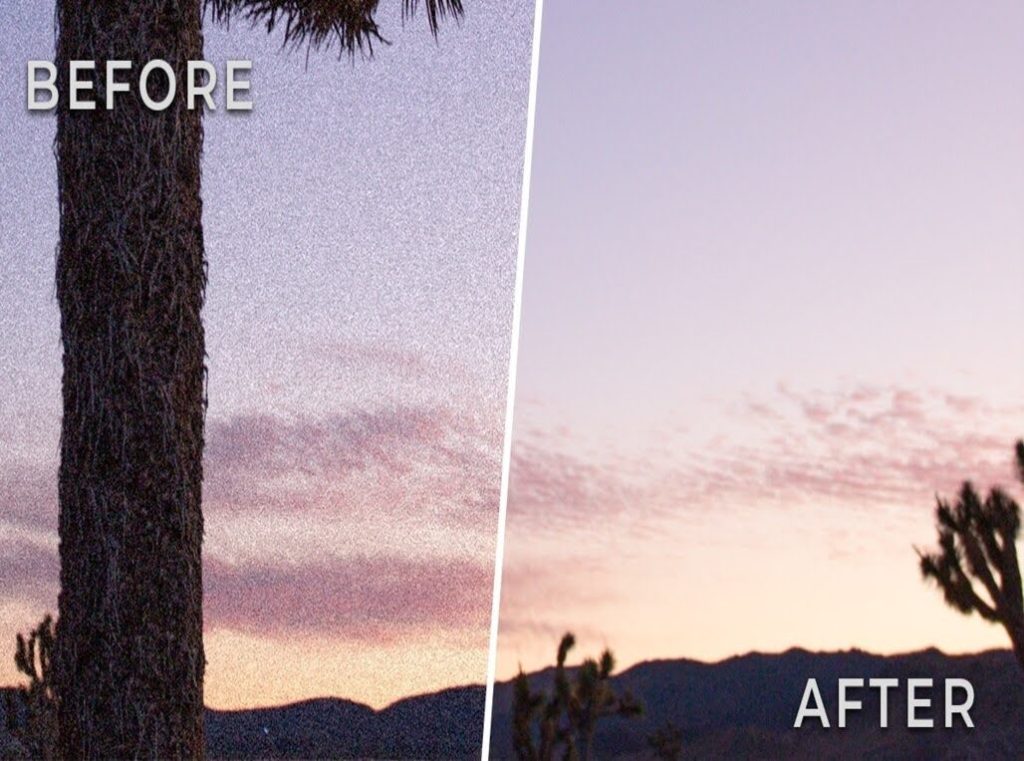
The grain is glaring and detracts from the overall quality of the image that we will be using. But by utilising Photoshop to minimise noise, we can fix all of that.
- Launch Photoshop and open the image. Select Filter > Noise > Photoshop minimise noise.
- Strength, Preserve Details, Reduce Colour Noise, and Sharpen Details are the options available to you in the Reduce Noise pop-up window.
- You can fix the image by adjusting the three sliders.
- If you want to see the preview, make sure to press> Remove JPEG Artefact on the bottom.
How To Fix Grainy Photos In Lightroom
The Photoshop method used to remove noise is remarkably similar to that used in Lightroom. Lightroom is a fully analogous version of Adobe Camera Raw, albeit with a somewhat different user interface.
- Navigate to the Development / Develop tab after opening the image.
- The Detail tab can be found in the options panel on the right side.
- The Noise Reduction column can be found on the Detail tab.
Noises related to brightness and colour are controlled using the respective sliders: the Luminance and Color sliders. These are the fundamental instruments for reducing noise. Similar to Photoshop, the Detail / Detail sliders control the effect threshold, restoring both detail and, frequently, noise.
The Contrast / Contrast slider restores contrast to the image, while the Smoothness / Smoothness for Color Noise slider controls how smoothly colours move and prevents the tool from discolouring anything other than noise.

How To Fix A Grainy Photo On Iphone
If you’re not close to a desktop, iPhones are still another fantastic choice for sharpening grainy photographs. The following procedures will help you upscale and sharpen your photos on your iPhone:
- To begin, select your photograph and open the > Photos app.
- Then, select the > Edit button located in the upper-right corner.
- To access the Sharpness tool (the triangle-shaped one), scroll right.
- To improve the sharpness of your photographs, drag the slider to the right.
- Subsequently, select the > Definition tool (the triangular tool with a central line).
Try simply resetting your iPhone if everything else fails. Sometimes a technical issue causes blurry pictures.

How To Fix A Grainy Photo On Android
There are also several useful tools for upscaling images on Android phones. Similar to iPhones, you may evaluate if your Android phone’s camera quality improves by restarting it. If not, attempt these methods on how to fix a grainy photo on an Android phone:
- Select the > edit button located at the bottom of the photo that you wish to change.
- To select > Adjust, swipe left.
- Select the triangle icon with the line in the centre, which is the > Sharpen option.
- For a crisper image, move the slider to the right.
- Under Adjust, you also have the option to select > De-noise.
- To lessen the noise in your picture, drag the slider to the right.
- Image source: PhoneArena

How To Fix A Grainy Photo On Designify
Utilise any image to generate AI-powered designs that may be enhanced with colour, have backdrops automatically removed, have smart shadows adjusted, and much more. You can immediately save, download, or share your designs.
- Click Upload Image after opening Designify in your mobile browser.
- Select the > Edit menu item.
- Choose > Elements
- Select the > Pencil symbol.
- Select > Sharpen from the > Pixelation menu.
- Click the > Save button located in the upper-left corner to get your newly created PNG file.

How to Restore Grainy Images without Lightroom or Photoshop
The following techniques can assist you in managing noise and grain in images:
-
Reduce the ISO on the digital camera:
A digital camera’s ISO setting allows you to control how much light enters the lens. Maintaining the ISO as near to 100 as feasible is advised. However, use a higher ISO on your camera when taking pictures indoors.
-
Purchase reflectors and artificial lighting:
We advise employing artificial lights, such as a flashlight or strobe, if you find yourself in low light. These outside light sources may aid in improving the object’s exposure. Reflectors are another tool you can utilise to lighten certain gloomy locations.
-
Boost visibility:
Increase the aperture or decrease the shutter speed to slightly overexpose your images if you’re shooting at a high ISO. Overexposure, however, can have a detrimental effect on the images and result in a notable loss of detail that is challenging to restore in post-production.
-
Switch off the noise reduction:
Modern cameras often feature noise reduction, a feature that helps fix grainy photos without editing, with each camera having its unique method of activating this feature.
For grainy images, the camera menu lets you turn on a noise reduction feature with three levels of adjustment: low, medium, and high. Because high settings might obliterate details, we advise using moderate or medium levels.
-
Take RAW photos rather than JPEGs:
For additional control, it’s best to use the RAW file format and turn off camera noise reduction. When using picture editing software, the primary file is easier to modify when it is saved in RAW format, which also protects the image detail.
How to Fix Grainy Photos Online
Grainy photos, often referred to as “noise,” can be a common problem, especially when shooting in low light or with higher ISO settings. Fortunately, there are several online tools and techniques you can use to fix grainy photos without the need for expensive software or extensive editing skills.
1. Use Online Photo Editors
Several online photo editors offer noise reduction features that can help smooth out grainy photos. Some of the most popular tools include:
- Fotor: This user-friendly editor has a “Denoise” tool that reduces noise in photos with just a few clicks.
- Pixlr: Pixlr offers a variety of filters, including noise reduction, to help fix grainy images quickly.
- LunaPic: LunaPic provides a simple yet effective “Smooth” filter that can minimize graininess in your photos.
2. Adjust Brightness and Contrast
Sometimes, adjusting the brightness and contrast of a photo can help reduce the appearance of grain. By brightening a dark image or tweaking the contrast, you can often make the noise less noticeable.
3. Resize the Image
Reducing the size of a grainy image can also help minimize the appearance of noise. When you resize a photo, the pixels are compressed, which can make the grain less visible.
4. Apply Blur Filters
Applying a slight blur filter can help smooth out the grain in a photo. Many online editors offer blur options, which can be adjusted to achieve the desired effect without losing too much detail.
5. Use AI-Powered Tools
AI-powered online tools like Let’s Enhance or VanceAI offer advanced noise reduction algorithms that can automatically detect and reduce grain in photos while preserving details.
6. Save in High-Quality Formats
When exporting your edited photo, choose a high-quality format like PNG or TIFF to avoid introducing additional compression artifacts that can make the grain worse.
Why Are My Pictures Grainy Even at Low ISO?
Graininess in photos, even at low ISO settings, can be frustrating and confusing. Here are some common reasons why this might happen:
1. Underexposure
Even at a low ISO, if your image is underexposed (too dark), it can result in graininess. When you try to brighten the image in post-processing, the grain becomes more noticeable. To avoid this, ensure that your photo is properly exposed when you take it.
2. Small Sensor Size
Cameras with smaller sensors (like those in smartphones or entry-level cameras) are more prone to noise, even at lower ISO settings. This is because smaller sensors have less surface area to capture light, leading to more digital noise.
3. Long Exposure Times
Using long exposure times can introduce noise into your photos, even at low ISO. This is because the sensor is exposed to light for a longer period, increasing the chances of noise. Using a tripod and ensuring proper exposure can help mitigate this.
4. Poor Lighting Conditions
Shooting in poor lighting conditions can cause your camera to struggle, leading to grainy photos. Even if your ISO is low, inadequate lighting can force your camera to boost the exposure digitally, which can introduce noise.
5. Post-Processing
If you’re applying heavy edits, especially when trying to brighten a dark image, you can inadvertently introduce or exaggerate grain. Try to get the best exposure in-camera to minimize the need for such adjustments.
6. Heat and Sensor Noise
In some cases, heat generated by the camera’s sensor during prolonged use can cause noise, even at low ISO. This is more common in older cameras or in extreme temperature conditions.
Why Are My Photos Grainy When I Zoom In?
Graininess becomes more apparent when you zoom in on a photo, even if the original image looks fine at normal size. Here’s why:
1. Pixelation
When you zoom in on a photo, especially if it’s a digital zoom (not an optical zoom), you’re essentially enlarging the pixels that make up the image. This can make the grain or noise in the photo much more visible.
2. Low Resolution
If your photo is taken at a lower resolution, zooming in can reveal the limitations of the image’s detail. The pixels become more apparent, making the grain more noticeable.
3. Compression Artifacts
Photos saved in compressed formats like JPEG may develop artifacts that look like noise when you zoom in. This happens because compression reduces the file size by removing some data, which can affect image quality.
4. Noise Amplification
When you zoom in on a photo, any noise present in the image is amplified along with the rest of the details. This is especially true for photos taken in low light or at high ISO settings.
5. Poor Quality Lens
Sometimes, the lens used to take the photo may introduce softness or aberrations that become more noticeable when zoomed in. This can make the grain or noise more apparent in certain areas of the image.
6. Digital Enhancements
If the photo has undergone digital enhancement or sharpening, these edits can increase the visibility of noise when zoomed in. Over-sharpening, in particular, can exaggerate graininess.
How to Minimize Grain When Zooming In
- Shoot in High Resolution: Always use the highest resolution setting available on your camera.
- Use Optical Zoom: If possible, rely on optical zoom rather than digital zoom to preserve image quality.
- Avoid Over-Editing: Be cautious with post-processing, especially with sharpening and exposure adjustments, as these can amplify grain.
- Use a Quality Lens: Invest in good lenses that provide sharp, clear images with minimal distortion.
Conclusion
Grain can significantly reduce an image’s quality and detract from the viewing experience in both images and films. Grainy images can result from a variety of circumstances, but once the picture is shot, it is irreversible and cannot be retaken.
Grainy photographs can be fixed, though, with a variety of available techniques. Regardless of whether you utilise Lightroom, Photoshop, Designify, an iPhone, or an Android device, you can be confident that the quality of your images and videos will be optimal, and that your memories will be preserved indefinitely.
Regardless of the image editing software you choose, fixing blurry photographs will become second nature. Do follow the above steps on how to fix a grainy photo.


